glTF plugin version 2
You can add glTF models to the map using the glTF plugin version 2. The plugin loads and renders models entirely using the MapGL engine. This allows you to apply various effects to the models that you set in the map style: fog, light, shadows, and others. Use the plugin if you need to show multiple models on the map without affecting the base map style.
With the plugin you can:
- add glTF models to the map, show, and hide them
- customize interactive scenes: add floor plans for buildings on the map, switch floors, and view information about rooms
Important
Unlike its first version, the version 2 of the glTF plugin does not use the Three.js library now. To switch to the second version, see the Key changes in version 2 section.
Also, you can add models to the map using the Style editor and data sources: for more details, see the 3D models instruction.
Getting started
To get started with the glTF plugin version 2, follow these steps:
- Add the plugin.
- Initialize the plugin.
- (Optional) Subscribe to plugin events.
1. Add the plugin
Using script tag
To use the plugin, add the line to the page code:
<script src="https://unpkg.com/@2gis/mapgl-gltf@^2/dist/bundle.js"></script>
The main plugin class is available in the mapgl namespace:
const plugin = new mapgl.GltfPlugin(map);
Using npm package
If you use the npm, include the library using the @2gis/mapgl-gltf package:
npm install @2gis/mapgl-gltf
2. Initialize the plugin
To initialize the plugin, pass an existing map entity to the plugin constructor:
const plugin = new GltfPlugin(map);
Default values are applied to PluginOptions. To customize the plugin, pass additional options as the second argument:
const plugin = new GltfPlugin(map, {
    hoverOptions: {
        color: '#ff000088',
    },
    labelGroupDefaults: {
        fontSize: 16,
    },
    modelsBaseUrl: 'https://example.com/s3_storage/gltf_models',
    modelsLoadStrategy: 'dontWaitAll',
    floorsControl: {
        position: 'centerLeft',
    },
    groundCoveringColor: '#000000CC',
    zIndex: 5,
});
Where:
-
hoverOptions- models in the hover state. Only thecoloroption is available. The default value is#FFFFFF. Color is applied by multiplying all the components. -
labelGroupDefaults- default values for label groups, if LabelGroupOptions are not specified:-
fontSize- font size for labels. The default value is14. -
fontColor- font color for labels. The default value is#000000. -
image- options for the label text background. Applied to the group if theimagevalue in LabelGroupOptions is set asdefault. The default value:{
url: 'data:image/svg+xml;base64,PHN2ZyB3aWR0aD0iMjgiIGhlaWdodD0iMjgiIHZpZXdCb3g9IjAgMCAyOCAyOCIgeG1sbnM9Imh0dHA6Ly93d3cudzMub3JnLzIwMDAvc3ZnIj48cmVjdCB3aWR0aD0iMjgiIGhlaWdodD0iMjgiIHJ4PSI0IiBmaWxsPSIjZWFlYWVhIi8+PHJlY3QgeD0iMSIgeT0iMSIgd2lkdGg9IjI2IiBoZWlnaHQ9IjI2IiByeD0iMyIgZmlsbD0id2hpdGUiLz48L3N2Zz4=',
size: [38, 38],
stretchX: [[4, 24]],
stretchY: [[4, 24]],
padding: [5, 10, 5, 10],
}
-
-
modelsBaseUrl- URL to define the relative path of the model. If the model URL is set without a protocol (http://orhttps://) and the domain name, models are loaded relatively to this parameter. The default value is'', so all models are loaded relatively to the web application host. -
modelsLoadStrategy- strategy of loading and displaying models. Possible values:waitAll- all models are loaded and then displayed on the map simultaneously (default value). For interactive scenes, all models from the scene configuration (including floor plan models) are loaded simultaneously. This increases the amount of loaded data and the time of displaying the scene on the map. However, switching floor plans happens without delays. All models from the realty scene appear on the map synchronously.dontWaitAll- each model is displayed as soon as it is loaded. For interactive scenes, only the main models (including a floor plan if the initial scene state is defined) are loaded. This enables reducing the amount of loaded data and displaying the scene as soon as possible. Models are displayed asynchronously as each model is loaded. During floor plan switching, the target floor is shown with a delay unless it has been loaded before.
-
floorsControl- settings of the UI element with floor buttons on the interactive realty scene. Only thepositionoption is currently available. The default value iscenterLeft. See the list of possible values in the ControlPosition. -
groundCoveringColor- map background color when an underground floor is displayed. The default value is#F8F8EBCC -
zIndex- order of rendering plugin objects (models, labels) relative to other Objects on the map.
3. Subscribe to plugin events
To subscribe to plugin events that occur during interaction with models and labels:
plugin.on('click', (event) => {
    console.log(event);
});
See the list of events that you can subscribe to at GltfPluginEventTable. Depending on the object provokes an event, a GltfPluginModelEvent or a GltfPluginLabelEvent is passed to the handler function.
Working with models
To add a model to the map, you need to upload and display it. The way the model is displayed on the map depends on the modelsLoadStrategy option specified during plugin initialization.
Adding a single model
-
Before uploading, make sure a model meets the requirements.
-
To upload the model, use the
addModel()method and pass ModelOptions as the first argument (the second argument is not specified):plugin.addModel({
modelId: 'ea234f1',
modelUrl: 'http://example.com/models/model1.glb',
coordinates: [55.27087, 25.19668],
rotateZ: -116,
scale: 2,
interactive: true,
});Specify:
-
modelId- unique identifier of the model. -
modelUrl- URL for uploading the model. -
coordinates- geographic coordinates of the model (longitude and latitude). -
rotateZ- rotation of the model relative to the Z-axis in degrees. -
scale- scale of the model specified in relative units based on the model original size. -
interactive- flag indicating whether the model is interactive.
Note
Instead of manually adjusting the model positioning settings (coordinates, rotation, and scale), use the tool for positioning models on the map. You can position the model and copy the configuration values: for more details, see the Placing models on the map section.
-
-
If you need to upload the model into the cache without displaying it immediately, pass
trueas the second argument to theaddModel()method. -
To display the model, use the
showModel()method and pass its identifier:plugin.showModel('ea234f1');
Adding multiple models
-
Before uploading, make sure models meet the requirements.
-
To upload models, use the
addModels()method and pass an array of ModelOptions as the first argument (the second argument is not specified):const models = [
{
modelId: 'ea234f1',
modelUrl: 'http://example.com/models/model1.glb',
coordinates: [55.27087, 25.19668],
rotateZ: -116,
scale: 2,
interactive: true,
},
{
modelId: '347da1',
modelUrl: 'http://example.com/models/model2.glb',
coordinates: [55.27087, 25.19668],
rotateZ: -116,
scale: 2,
},
];
plugin.addModels(models);Specify:
-
modelId- unique identifier of the model. -
modelUrl- URL for uploading the model. -
coordinates- geographic coordinates of the model (longitude and latitude). -
rotateZ- rotation of the model relative to the Z-axis in degrees. -
scale- scale of the model specified in relative units based on the model original size. -
interactive- flag indicating whether the model is interactive.
Note
Instead of manually adjusting the model positioning settings (coordinates, rotation, and scale), use the tool for positioning models on the map. You can position the model and copy the configuration values: for more details, see the Placing models on the map section.
-
-
If you need to upload the models into the cache but display only some of them, pass an array of their identifiers as the second argument to the
addModels()method:plugin.addModels(models, ['ea234f1']);To upload the models into the cache without displaying them immediately, pass an empty array as the second argument:
plugin.addModels(models, []); -
To display the models, use the
showModels()orshowModel()methods and pass their identifiers:plugin.showModels(['ea234f1', '347da1']);Or:
plugin.showModel('ea234f1');
Example of adding models to the map:
Replacing a map object with a model
If you need to display a model instead of an object on the map (for example, a building) that overlaps the model, hide the object:
-
Get object identifiers:
-
Enable logging of object identifiers on the map when clicked:
map.on('click', (e) => {
    console.log(e);
}); -
Open the browser Developer Tools (press F12) and click the objects you want to hide. Copy the identifier from the
target.idfield of the click event. For example:{
"originalEvent": {
"isTrusted": true
},
"lngLat": [55.27087, 25.19668],
"point": [420, 231],
"target": {
"id": "13933647002592567"
},
"targetData": {
"type": "default",
"id": "13933647002592567"
}
}
-
-
Pass an array of object identifiers to the
linkedIdsfield in ModelOptions:plugin.addModel({
modelId: 'ea234f1',
modelUrl: 'http://example.com/models/model1.glb',
linkedIds: ['13933647002592567'],
coordinates: [55.27087, 25.19668],
});
Adding labels
You can display additional text on the map using labels. The labels can be linked to a model or not. Labels can contain any information, such as building characteristics, apartment area, location details, or links. Label settings are added to the target field of the plugin label event GltfPluginLabelEvent.
To add labels to the map, use the addLabelGroup() method and pass LabelGroupOptions as an argument:
const labelGroup = {
    id: '722ea9',
    image: 'default',
    minZoom: 17,
    elevation: 30,
    interactive: true,
    labels: [
        {
            coordinates: [55.27087, 25.19668],
            text: '10 sqrt',
            userData: {},
        },
        {
            coordinates: [55.27087, 25.19668],
            text: '20 sqrt',
            elevation: 33,
            interactive: false,
        },
    ],
};

plugin.addLabelGroup(labelGroup);
Specify:
minZoom- the minimum zoom level at which labels in the group are displayed.elevation- height of labels in the group.interactive- flag indicating whether labels in the group are interactive.labels- array of settings (LabelOptions) for each label. If settings for a particular label are specified (for example,elevationorinteractive), the value from the label takes precedence over the group value:coordinates- geographic coordinates of the label (longitude and latitude).text- label text.userData- custom parameters.elevation- label height.interactive- flag indicating whether the label is interactive.
To link a group of labels to a model (e.g., a building), pass the model options BuildingState as the second argument:
plugin.addLabelGroup(labelGroup, {
    buildingId: 'ea234f1',
});
To link a group of labels to a building floor, specify the floorId:
plugin.addLabelGroup(labelGroup, {
    buildingId: 'ea234f1',
    floorId: '123456',
});
Removing labels
To remove a group of labels from the map, use the removeLabelGroup() method and pass the group identifier as an argument:
plugin.removeLabelGroup('722ea9');
Hiding models��
To hide a single model from the map, use the hideModel() method and pass its identifier:
plugin.hideModel('ea234f1');
To hide multiple models from the map, use the hideModels() method and pass an array of their identifiers:
plugin.hideModels(['ea234f1', '347da1']);
Removing models
To remove a single model from the map and cache, use the removeModel() method and pass its identifier:
plugin.removeModel('ea234f1');
To remove multiple models from the map and cache, use the removeModels() method and pass an array of their identifiers:
plugin.removeModels(['ea234f1', '347da1']);
Working with interactive scenes
You can create an interactive realty scene to display buildings with floor plans and labels on the map. You can interact with buildings on the scene, for example, switch floors and view information about rooms. The way models are displayed on the map depends on the modelsLoadStrategy option specified during plugin initialization.
Configuring the main building model
To configure the main building model (facade), specify the BuildingOptions:
const facade = {
    modelId: 'ea234f1',
    modelUrl: 'http://example.com/models/model1.glb',
    coordinates: [55.27087, 25.19668],
    rotateZ: -116,
    scale: 2,
    interactive: true,
    linkedIds: ['13933647002592567'],
    mapOptions: {
        center: [55.271321201282895, 25.196442258306178],
        pitch: 50.4,
        zoom: 18.52,
        rotation: -115.7,
    },
    popupOptions: {
        coordinates: [55.271024122768324, 25.19693053802895],
        title: 'Apartments Tower B',
        description:
            'Ready <br> Central A/C & Heating, Security, Concierge Service <br> Private: Garden, Gym, Pool',
    },
};
Specify:
modelId- unique identifier of the model.modelUrl- URL for uploading the model.coordinates- geographic coordinates of the model (longitude and latitude).rotateZ- rotation of the model relative to the Z-axis in degrees.scale- scale of the model specified in relative units based on the model original size.linkedIds- array of identifiers for objects on the map that need to be hidden.interactive- flag indicating whether the model is interactive. For more information, see the Interactivity section.mapOptions- map options (MapOptions). Applied when the facade is activated. For more information, see the Map options section.popupOptions- popup options (PopupOptions). Displayed when hovering over the facade. For more information, see the Popups section.
Note
Instead of manually adjusting the model positioning settings (coordinates, rotation, and scale), use the tool for positioning models on the map. You can position the model and copy the configuration values: for more details, see the Placing models on the map section.
Configuring floor plans
To add floor plans to the main building model, specify the options BuildingFloorOptions in the floors array.
For each building, floors are specified from the lowest floor (including floors with negative numbers or parking) to the highest floor. Floor plan configurations reuse the options of the main building model, so you do not need to define coordinates, rotation, and scale for the floor plans of the same building.
const buildingOptions = {
    ...facade,
    floors: [
        {
            id: '235034',
            modelUrl: 'http://example.com/models/model1_floor1.glb',
            text: '1-10',
            mapOptions: {
                center: [55.271321201282895, 25.196442258306178],
                pitch: 50.4,
                zoom: 18.52,
                rotation: -115.7,
            },
            labelGroups: [
                {
                    id: '1111',
                    image: 'default',
                    minZoom: 18.9,
                    elevation: 10,
                    fontSize: 9,
                    fontColor: '#3a3a3a',
                    interactive: true,
                    labels: [
                        {
                            coordinates: [55.27095943017267, 25.197085861856678],
                            text: '1 Bed\n323 sqft',
                            userData: {
                                url: 'https://dev.urbi.ae/',
                            },
                        },
                        {
                            coordinates: [55.271011424317585, 25.19704189077632],
                            text: '1 Bed\n360 sqft',
                            userData: {
                                url: 'https://dev.urbi.ae/',
                            },
                        },
                        ...
                    ],
                },
            ],
        },
    ],
};
Specify:
id- unique identifier of the floor in the building.modelUrl- path to the file containing the floor model. If a relative path is specified, the final URL is constructed based on themodelsBaseUrlparameter specified in the PluginOptions.text- name of the floor displayed in the UI element with floor buttons. For example, you can set the namePor-1for parking.mapOptions- map options (MapOptions). Applied when the floor plan is activated. For more information, see the Map options section.labelGroups- groups of labels for the floor plan (LabelGroupOptions), which you can use to display additional information about rooms on the floor (e.g., different groups for sold apartments and apartments for sale). For more information, see the Floor labels section.
Configuring underground floors
To display an underground floor, add to the floor plan options BuildingFloorOptions the isUnderground property with the true value:
{
    ...
    floors: [{
        id: '235034',
        text: '1-10',
        modelUrl: 'http://example.com/models/model1_floor1.glb',
        isUnderground: true,
    }],
}
When displaying an underground floor plan, a background appears, overlapping other objects on the map. Other objects in the interactive scene are hidden and do not overlap the displayed underground floor plan.
The default background color is #F8F8EBCC. To change the color, set the value of the groundCoveringColor property in the PluginOptions. To change the color dynamically, use the setOptions() method (can be useful when changing the map style).
Adding an interactive scene
To add an interactive scene to the map, use the addRealtyScene() method (the method automatically sets up all necessary event handlers for the scene to work correctly) and pass the configured BuildingOptions:
plugin.addRealtyScene([buildingOptions]);
To specify which facade and floor are active after adding the scene to the map, pass the scene state (BuildingState) as the second argument:
plugin.addRealtyScene([buildingOptions], { modelId: 'ea234f1', floorId: '235034' });
Example of adding an interactive scene to the map:
Once the models are displayed on the map, click one of them to display the floor plans.
Example of creating an interactive scene
You can configure an interactive realty scene for the glTF plugin v2 using the tool for model placement on the map. Using the tool, you can place and position models on the map. A configuration file of the interactive scene is generated automatically.
To create an interactive scene:
1. Place models on the map
-
Make sure models meet the requirements.
-
Open the tool for model placement on the map.
-
Open the map area to add models:
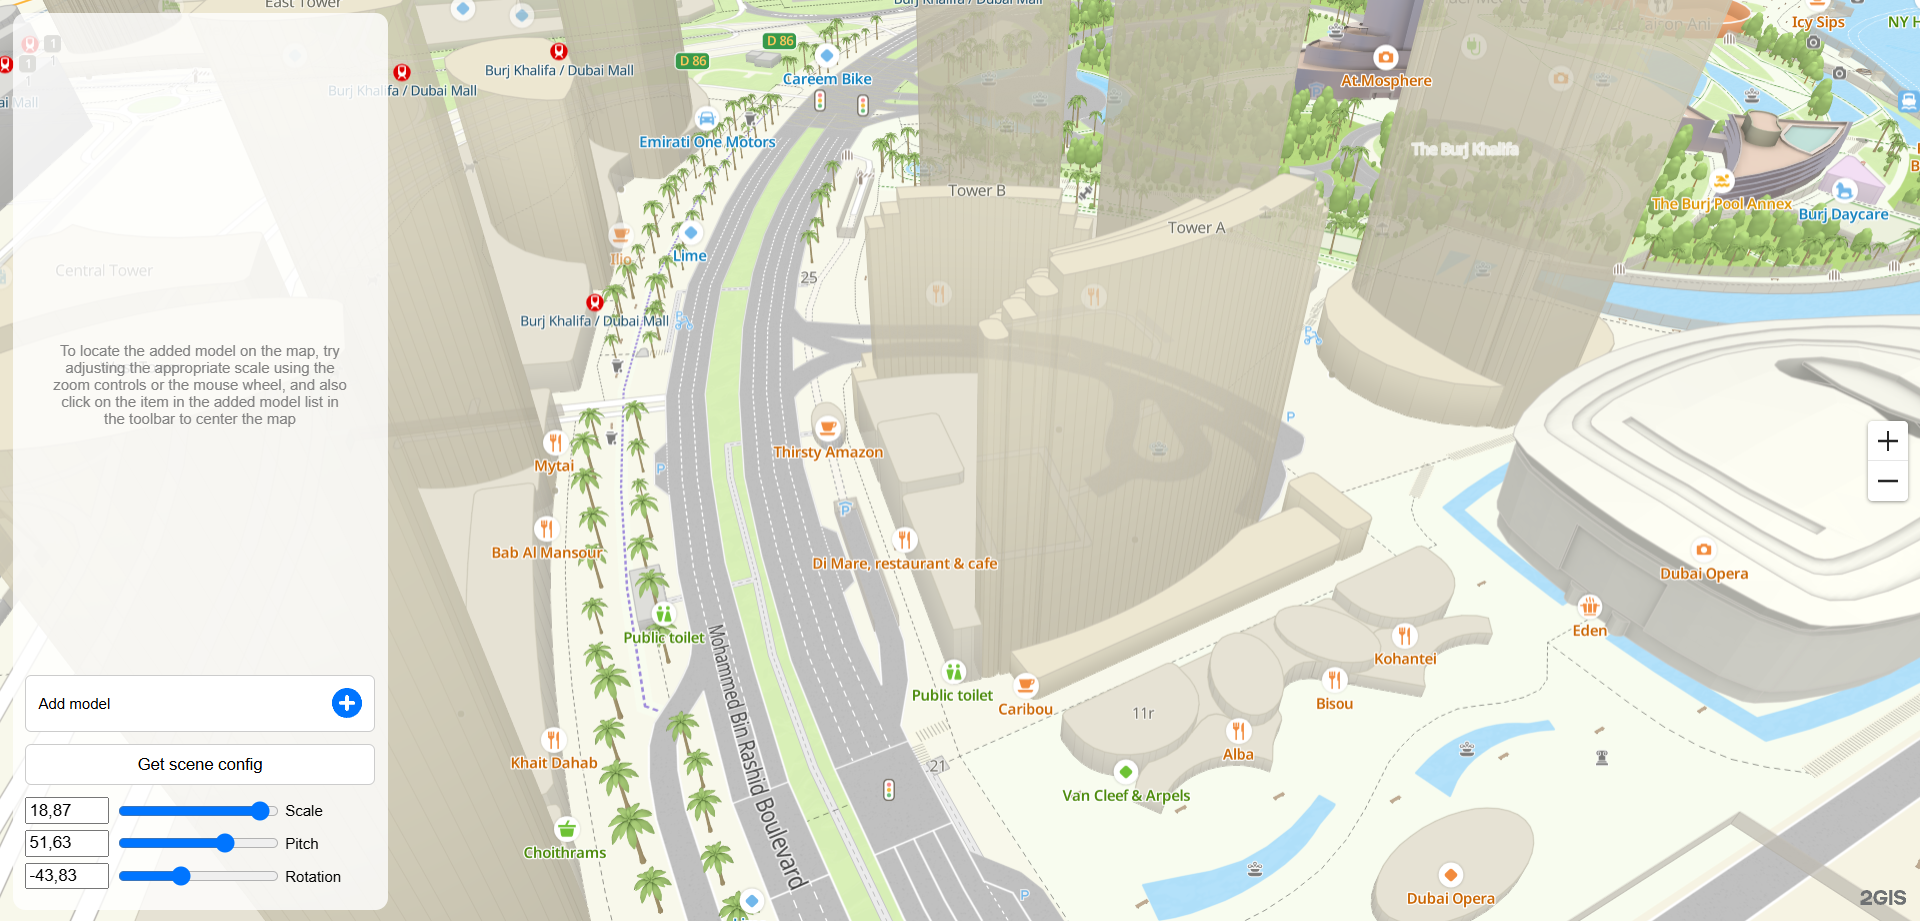
-
Click Add model and select a model from the list of files:
Note
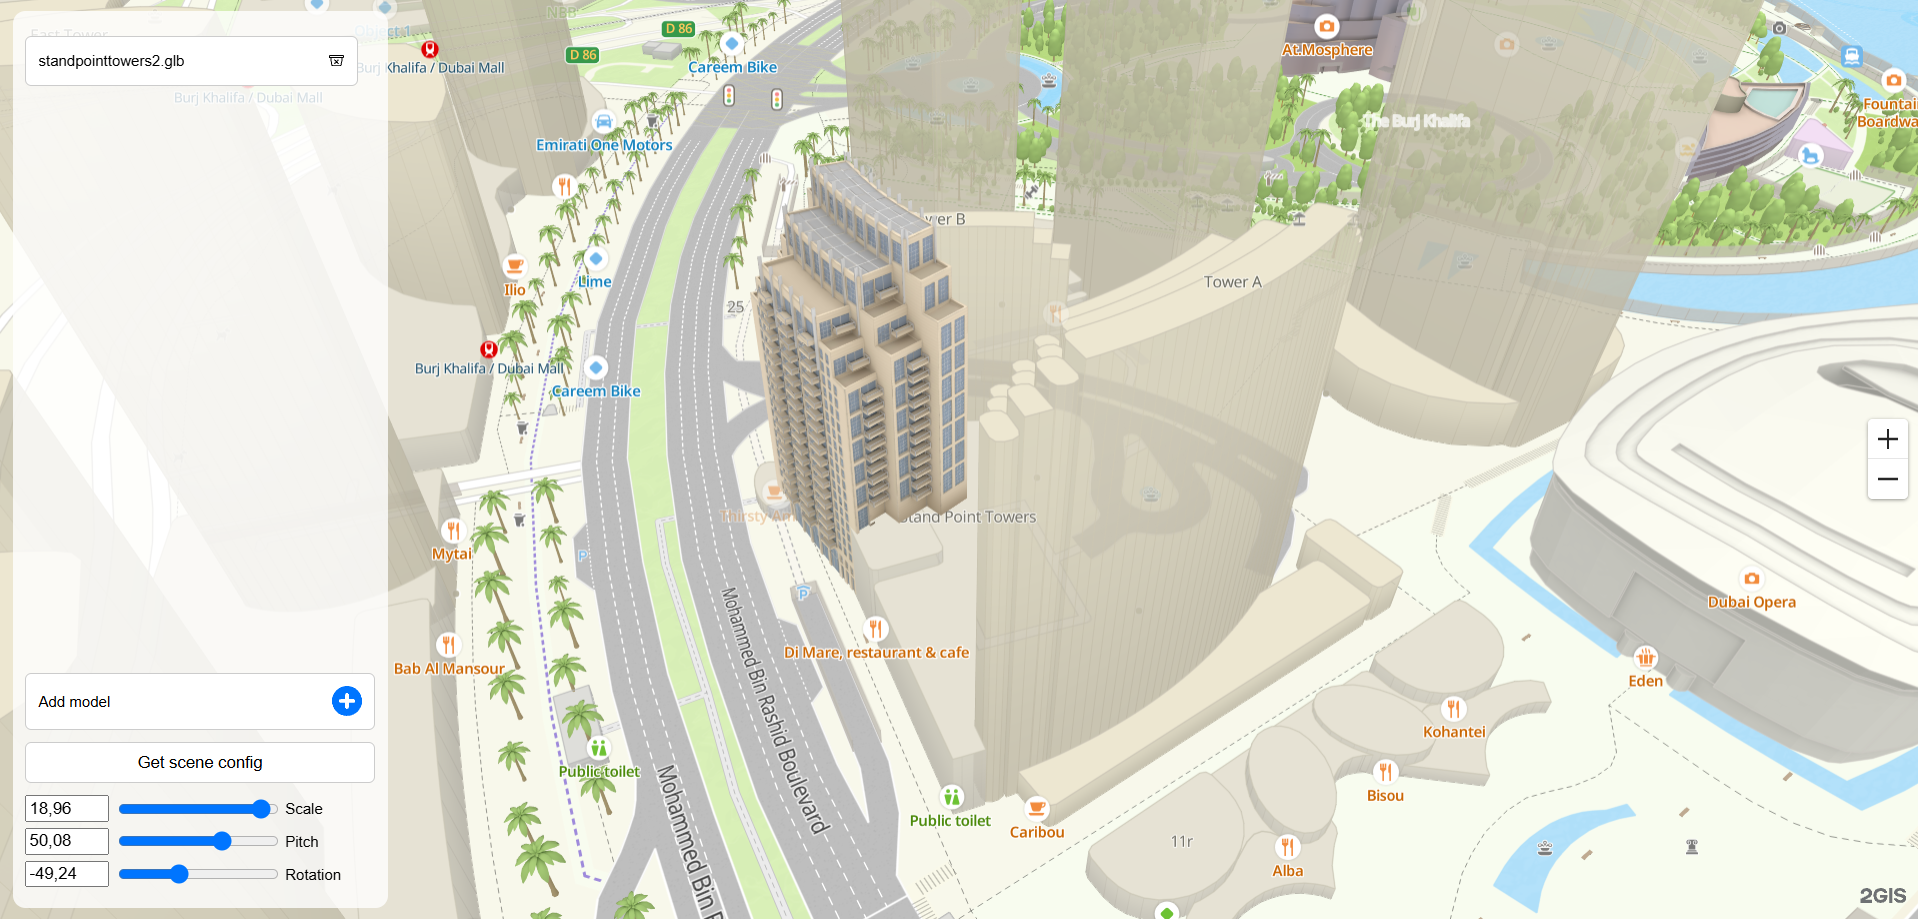
If you need to add one model to the map in multiple copies (for example, for a typical building), add the model from the same file the required number of times.
-
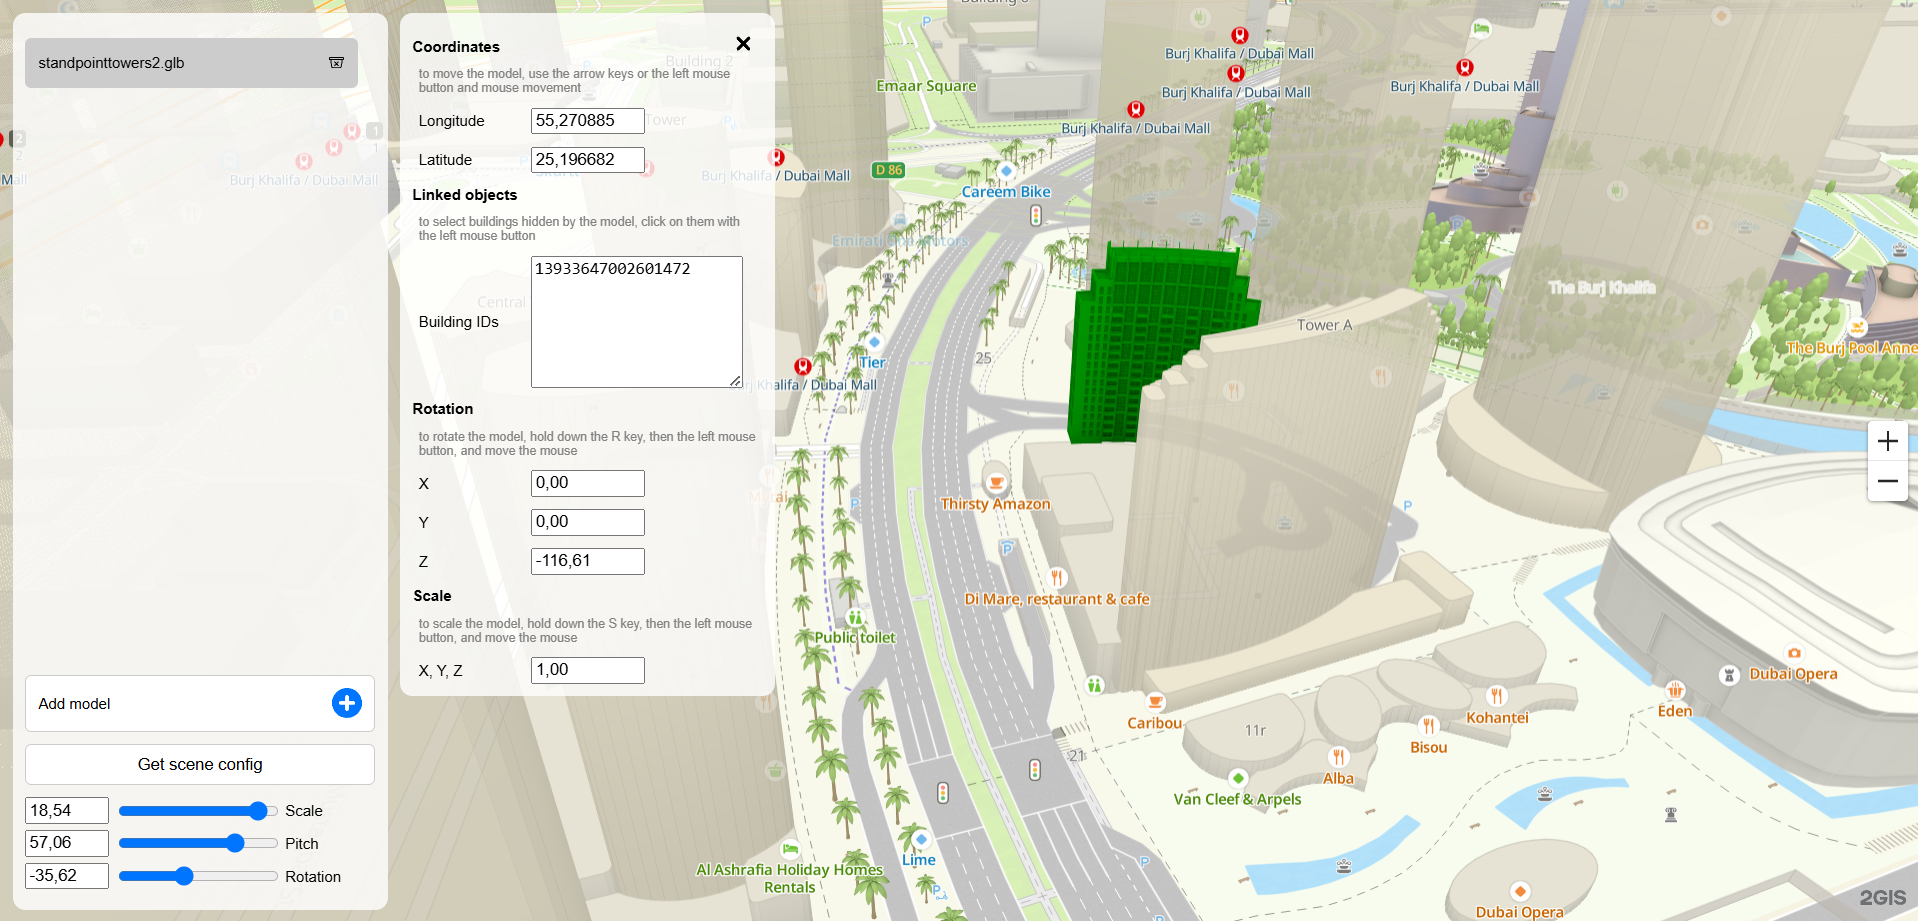
Click the added model. The model is highlighted in green, and a pane with its positioning settings is opened:

-
To hide an object on the map that overlays the model, click it or add the building ID to the Building IDs field:

-
Position the added model on the map:
- Specify the exact coordinates of the model in the Coordinates block, in the Longitude and Latitude fields. You can also move the model manually: use the arrow keys or hold down and drag the model using the mouse.
- Specify the model rotation values for each axis in the Rotation block, in the X, Y, Z fields. You can also rotate the model around the Z axis: hold down the
Rkey, wait until the cursor changes to the icon, hold down and rotate the model using the mouse.
 - Specify the model scale value in the Scale block, in the X, Y, Z field. You can also change the scale of the model manually: hold down the
Skey, wait until the cursor changes to the icon, hold the model using the mouse, and move it away from the model (to zoom in) or toward the center (to zoom out).
-
If you need to place multiple models on the scene, add them and repeat the steps above for each added model:

If you need to remove a model from the scene, click the
 icon next to the model name and confirm the deleting.
 -
To view the resulting scene, clear the selection of the last edited model. To do this, close the model parameters pane or press the
Esckey. Check the display of the model by rotating and zooming the map: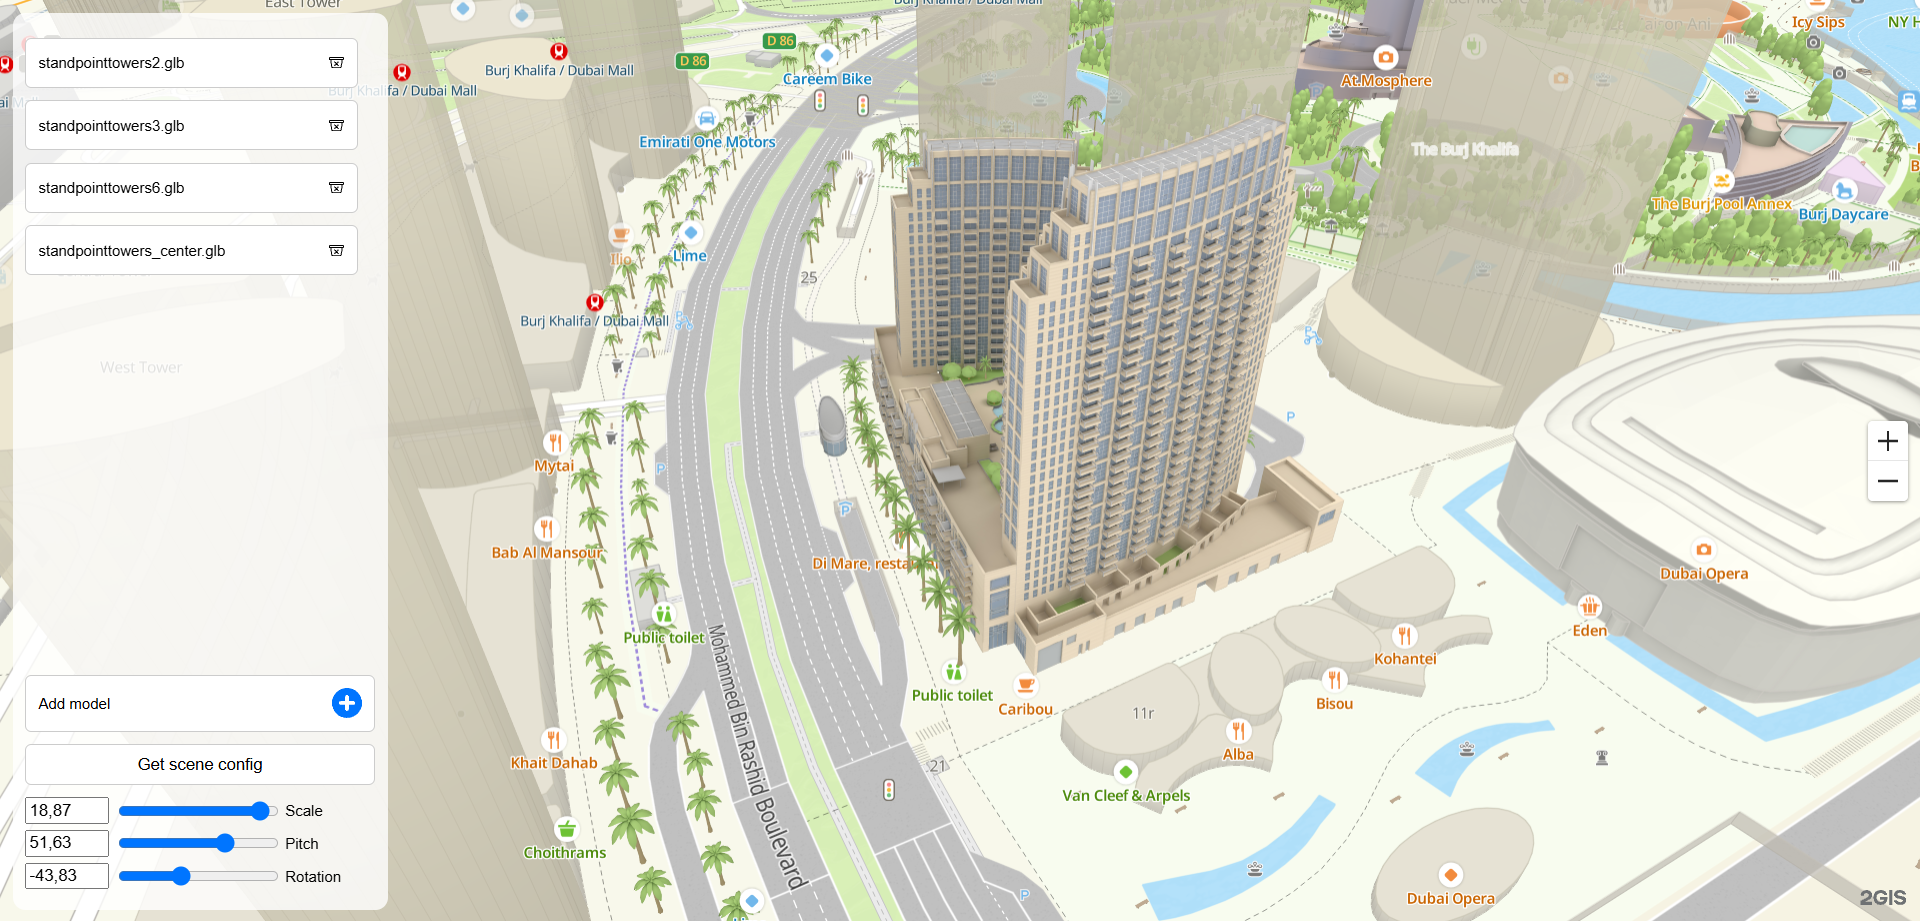
-
Click Get scene config and download the
mapgl-gltf-config.jsonconfiguration file. The file contains a preliminary configuration of the interactive scene and an array of settings for each model.
Configuration file example:
mapgl-gltf-config.json
[
    {
        modelId: 'standpointtowers2_53476f256963fa7b70f5d759b7834c70bb8e507a',
        coordinates: [55.27088522875024, 25.196681784153185],
        modelUrl: 'standpointtowers2.glb',
        interactive: true,
        rotateX: 0,
        rotateY: 0,
        rotateZ: -116.60999999999991,
        scale: 1,
        linkedIds: ['13933647002601472'],
        floors: [],
    },
    {
        modelId: 'standpointtowers3_afc8e88d16e1936a9a087eb2f02193f4220ce619',
        coordinates: [55.27088606843354, 25.19668331126981],
        modelUrl: 'standpointtowers3.glb',
        interactive: true,
        rotateX: 0,
        rotateY: 0,
        rotateZ: 243.91000000000005,
        scale: 1,
        linkedIds: ['13933647002601471'],
        floors: [],
    },
    {
        modelId: 'standpointtowers6_d2baef1cd770b0c07f558fd8c94ba5589a2c7ab0',
        coordinates: [55.27067156776716, 25.197123844470752],
        modelUrl: 'standpointtowers6.glb',
        interactive: true,
        rotateX: 0,
        rotateY: 0,
        rotateZ: 59.63999999999995,
        scale: 1,
        linkedIds: ['70030076452542637', '13933647002603034'],
        floors: [],
    },
    {
        modelId: 'standpointtowers_center_9c624c53dc3f6ffeffcb6524ff75556f08588fb6',
        coordinates: [55.270887739054025, 25.19668130155175],
        modelUrl: 'standpointtowers_center.glb',
        interactive: true,
        rotateX: 0,
        rotateY: 0,
        rotateZ: -116.40999999999987,
        scale: 1,
        linkedIds: ['13933647002592567'],
        floors: [],
    },
];
2. Configure floor plans
-
Add the
floorsarray for each model to themapgl-gltf-config.jsonconfiguration file. For each building, floors are listed from the lowest floor (including the floor with a negative number or parking) to the highest floor.For example, to add a floor to the first building from the file, add an object to the
floorsarray with the basic floor parameters:{
modelId: 'standpointtowers2_53476f256963fa7b70f5d759b7834c70bb8e507a',
coordinates: [55.27088522875024, 25.196681784153185],
modelUrl: 'standpointtowers2.glb',
interactive: true,
rotateX: 0,
rotateY: 0,
rotateZ: -116.60999999999991,
scale: 1,
linkedIds: ['13933647002601472'],
floors: [{
id: '2',
text: '2',
modelUrl: 'standpointtowers4-2.glb',
}],
}For a detailed description of the parameters, see Configuring floor plans.
-
To display the underground floor, add the
isUndergroundproperty with thetruevalue:{
...
floors: [{
id: '2',
text: '2',
modelUrl: 'standpointtowers4-2.glb',
isUnderground: true,
}],
} -
Add other floors to the building:
{
    ...
    floors: [
        {
            id: '2',
            text: '2',
            modelUrl: 'standpointtowers4-2.glb',
            isUnderground: true,
        },
        {
            id: '3',
            text: '3-17',
            modelUrl: 'standpointtowers4-3.glb',
        },
    ],
} -
If necessary, add floors to other buildings and repeat the steps above for each building.
Example of a configuration file with floor plan settings:
mapgl-gltf-config.json
[
    {
        modelId: 'standpointtowers2_53476f256963fa7b70f5d759b7834c70bb8e507a',
        coordinates: [55.27088522875024, 25.196681784153185],
        modelUrl: 'standpointtowers2.glb',
        interactive: true,
        rotateX: 0,
        rotateY: 0,
        rotateZ: -116.60999999999991,
        scale: 1,
        linkedIds: ['13933647002601472'],
        floors: [
            {
                id: '2',
                text: '2',
                modelUrl: 'standpointtowers4-2.glb',
                isUnderground: true,
            },
            {
                id: '3',
                text: '3-17',
                modelUrl: 'standpointtowers4-3.glb',
            },
        ],
    },
    {
        modelId: 'standpointtowers3_afc8e88d16e1936a9a087eb2f02193f4220ce619',
        coordinates: [55.27088606843354, 25.19668331126981],
        modelUrl: 'standpointtowers3.glb',
        interactive: true,
        rotateX: 0,
        rotateY: 0,
        rotateZ: 243.91000000000005,
        scale: 1,
        linkedIds: ['13933647002601471'],
        floors: [
            {
                id: '112',
                text: '1-12',
                modelUrl: 'standpointtowers5-2_without_transforms.glb',
            },
            {
                id: '1320',
                text: '13-20',
                modelUrl: 'standpointtowers5-1.glb',
            },
        ],
    },
    {
        modelId: 'standpointtowers6_d2baef1cd770b0c07f558fd8c94ba5589a2c7ab0',
        coordinates: [55.27067156776716, 25.197123844470752],
        modelUrl: 'standpointtowers6.glb',
        interactive: true,
        rotateX: 0,
        rotateY: 0,
        rotateZ: 59.63999999999995,
        scale: 1,
        linkedIds: ['70030076452542637', '13933647002603034'],
        floors: [],
    },
    {
        modelId: 'standpointtowers_center_9c624c53dc3f6ffeffcb6524ff75556f08588fb6',
        coordinates: [55.270887739054025, 25.19668130155175],
        modelUrl: 'standpointtowers_center.glb',
        interactive: true,
        rotateX: 0,
        rotateY: 0,
        rotateZ: -116.40999999999987,
        scale: 1,
        linkedIds: ['13933647002592567'],
        floors: [],
    },
];
3. Add an interactive scene to the map
To add an interactive scene with the configuration file data to the map, use the addRealtyScene() method:
plugin.addRealtyScene([
    {
        modelId: 'standpointtowers2_53476f256963fa7b70f5d759b7834c70bb8e507a',
        coordinates: [55.27088522875024, 25.196681784153185],
        modelUrl: 'standpointtowers2.glb',
        interactive: true,
        rotateX: 0,
        rotateY: 0,
        rotateZ: -116.60999999999991,
        scale: 1,
        linkedIds: ['13933647002601472'],
        floors: [
            {
                id: '2',
                text: '2',
                modelUrl: 'standpointtowers4-2.glb',
                isUnderground: true,
            },
            {
                id: '3',
                text: '3-17',
                modelUrl: 'standpointtowers4-3.glb',
            },
        ],
    },
    {
        modelId: 'standpointtowers3_afc8e88d16e1936a9a087eb2f02193f4220ce619',
        coordinates: [55.27088606843354, 25.19668331126981],
        modelUrl: 'standpointtowers3.glb',
        interactive: true,
        rotateX: 0,
        rotateY: 0,
        rotateZ: 243.91000000000005,
        scale: 1,
        linkedIds: ['13933647002601471'],
        floors: [
            {
                id: '112',
                text: '1-12',
                modelUrl: 'standpointtowers5-2_without_transforms.glb',
            },
            {
                id: '1320',
                text: '13-20',
                modelUrl: 'standpointtowers5-1.glb',
            },
        ],
    },
    {
        modelId: 'standpointtowers6_d2baef1cd770b0c07f558fd8c94ba5589a2c7ab0',
        coordinates: [55.27067156776716, 25.197123844470752],
        modelUrl: 'standpointtowers6.glb',
        interactive: true,
        rotateX: 0,
        rotateY: 0,
        rotateZ: 59.63999999999995,
        scale: 1,
        linkedIds: ['70030076452542637', '13933647002603034'],
        floors: [],
    },
    {
        modelId: 'standpointtowers_center_9c624c53dc3f6ffeffcb6524ff75556f08588fb6',
        coordinates: [55.270887739054025, 25.19668130155175],
        modelUrl: 'standpointtowers_center.glb',
        interactive: true,
        rotateX: 0,
        rotateY: 0,
        rotateZ: -116.40999999999987,
        scale: 1,
        linkedIds: ['13933647002592567'],
        floors: [],
    },
]);
Example of adding an interactive scene to the map:
Optional settings
You can specify optional scene settings:
- interactivity
- popups
- map options: a camera angle, a map center, and a map scale
- floor labels
Interactivity
You can add placeholder buildings, adjacent territories, city infrastructure objects, and environmental objects to the scene that are intended to be non-interactive. For example, the scene includes a building under construction without floors. To make a building on the map non-interactive (for example, unable to view floors), change the interactive property to false:
{
    modelId: 'model',
    modelUrl: 'model.glb',
    coordinates: [55.27088, 25.19668],
    interactive: false,
    ...
}
Popups
To display additional information about a building when you hover over it, add the popupOptions property:
{
    modelId: 'model',
    modelUrl: 'model.glb',
    coordinates: [55.27088, 25.19668],
    interactive: true,
    popupOptions: {
        coordinates: [55.271024122768324, 25.19693053802895],
        title: 'Apartments Tower B',
        description: 'Ready <br> Central A/C & Heating, Security, Concierge Service <br> Private: Garden, Gym, Pool',
    },
    ...
}
Specify:
coordinates- geographic coordinates of the popup (longitude and latitude).title- title of the popup.description- text in the popup.
Important
If the interactivity option is disabled for a building (
interactive: false), the popup does not appear when you hover over the building.
Map options
You can specify map options: a camera angle when a building or a floor plan is activated, a map center, and a map scale. Add the mapOptions property with map options to the options of each building and each floor plan.
-
To get the map options, open the browser Developer Tools (press F12), find the appropriate camera angle for the building or floor, and run the code on the console:
console.log(`mapOptions: {
    center: [${map.getCenter()}],
    pitch: ${map.getPitch()},
    zoom: ${map.getZoom()},
    rotation: ${map.getRotation()},
}`); -
Add the map options for the building and its floors:
{
    modelId: 'model',
    modelUrl: 'model.glb',
    coordinates: [55.27088, 25.19668],
    interactive: true,
    mapOptions: {
        center: [55.27104661856671, 25.19654143333551],
        pitch: 45,
        zoom: 19,
        rotation: -173,
    },
    floors: [
        {
            id: '2',
            text: '2',
            modelUrl: 'model_floor1.glb',
            isUnderground: true,
            mapOptions: {
                center: [55.27101659214413, 25.19692572574951],
                pitch: 17.8,
                zoom: 20.8,
                rotation: 137.02588223579758,
            },
        },
        {
            id: '3',
            text: '3-17',
            modelUrl: 'model_floor2.glb',
            mapOptions: {
                center: [55.27101659214413, 25.19692572574951],
                zoom: 20.75,
                pitch: 17.8,
                rotation: 137.02588223579758,
            },
        },
    ],
}
Specify:
center- geographic coordinates of the map center (longitude and latitude).zoom- map scale.pitch- camera tilt angle in degrees.rotation- camera rotation angle in degrees.
Floor labels
You can place labels on the floor plan, e.g., with information about rooms. To do this, configure label groups for each floor and specify the coordinates and height of the labels.
-
To get the coordinates, open the browser Developer Tools (press F12) and run the code on the console:
map.on('click', ({ lngLat }) => {
    console.log(lngLat);
});

plugin.on('click', ({ lngLat }) => {
    console.log(lngLat);
});
Now, when you click the map or any model, the console displays the coordinates of the click.
-
To make the floor where you want to add labels active, click the building and select the floor. For example, for the first building and the floor, named
11, determine the places where the labels will be placed and click them to get the coordinates.
Important
When you click the map or building, the coordinates of the flat map are returned. When you place labels for top floors, distortions of the perspective projection occur (the object appears larger when viewed from above).
-
To add labels to the floor options, fill in the array of groups LabelGroupOptions in the
labelGroupsoption of a floor plan:{
modelId: 'model',
modelUrl: 'model.glb',
coordinates: [55.27088, 25.19668],
...,
floors: [
...,
{
id: '3',
text: '3-17',
modelUrl: 'model_floor2.glb',
mapOptions: {
center: [55.27101659214413, 25.19692572574951],
pitch: 17.8,
zoom: 20.75,
rotation: 137.02588223579758,
},
labelGroups: [
{
id: '1111',
image: {
url: 'data:image/svg+xml;base64,PHN2ZyB3aWR0aD0iMjRweCIgaGVpZ2h0PSIyNHB4IiB2aWV3Qm94PSIwIDAgMjQgMjQiIHZlcnNpb249IjEuMSIgeG1sbnM9Imh0dHA6Ly93d3cudzMub3JnLzIwMDAvc3ZnIiB4bWxuczp4bGluaz0iaHR0cDovL3d3dy53My5vcmcvMTk5OS94bGluayI+PGcgaWQ9IlBhZ2UtMSIgc3Ryb2tlPSJub25lIiBzdHJva2Utd2lkdGg9IjEiIGZpbGw9Im5vbmUiIGZpbGwtcnVsZT0iZXZlbm9kZCI+PGcgaWQ9ImV4aXQiIGZpbGw9IiM2MDVFNTAiIGZpbGwtcnVsZT0ibm9uemVybyI+PHJlY3QgeD0iMCIgeT0iMCIgd2lkdGg9IjI0IiBoZWlnaHQ9IjI0IiByeD0iNSI+PC9yZWN0PjwvZz48L2c+PC9zdmc+',
size: [38, 38],
stretchX: [[4, 24]],
stretchY: [[4, 24]],
padding: [5, 10, 5, 10],
},
minZoom: 18.9,
elevation: 13,
interactive: true,
labels: [
{
coordinates: [55.27095943017267, 25.197085861856678],
text: '1 Bed\n323 sqft',
userData: {
url: 'https://dev.urbi.ae/',
},
},
{
coordinates: [55.271011424317585, 25.19704189077632],
text: '1 Bed\n360 sqft',
userData: {
url: 'https://dev.urbi.ae/',
},
},
],
},
...
],
},
],
}Specify:
image- label background. The default value is white. To customize the background, specify:url- image URL in the data-URL format. The label background image must be in the.svgformat.size- image size.stretchXandstretchY- stretch areas.padding- padding from the edges for text inside the label.
minZoom- minimum scale level at which labels are displayed in the group.elevation- height of labels in the group. Specify for the group or for each label to raise labels to the height of the floor.interactive- flag of interactivity of labels in the group.labels- array of settings (LabelOptions) for each label. If settings for a particular label are specified (for example,elevationorinteractive), the value from the label takes precedence over the group value:coordinates- geographic coordinates of the label (longitude and latitude).text- label text.userData- custom parameters.elevation- label height.interactive- flag indicating whether the label is interactive.
If you need to add multiple label groups on a floor (for example, if you need to separate sold apartments and apartments for sale), add a second group to the
labelGroupsarray.
Example of an interactive scene with optional settings
Hiding interactive scenes
To hide the interactive scene on the map, use the hideRealtyScene() method (uploaded models are saved in the cache):
plugin.hideRealtyScene();
To show the scene again, use the showRealtyScene() method:
plugin.showRealtyScene();
Removing interactive scenes
To remove the interactive scene from the map, use the removeRealtyScene() method:
plugin.removeRealtyScene();
Key changes in version 2
As the second version of the plugin does not use the ThreeJS library, you need to define scale, rotation, and translation parameters for models again: for more information, see the Configuring the model position section.
Changes in plugin options
-
Removed the following options from the PluginOptions interface:
dracoScriptsUrlbecause model loading is now done by the map engineambientLightbecause light is set up in map styles now. You can configure them in the Style editor.
-
Replaced the
hoverHighlightoption withhoverOptionswhere you can set up the hover state of the model. The color is applied by multiplying each component, so you cannot highlight the model with white color. -
Replaced the
poiConfigoption withlabelGroupDefaults, which contain default settings for all label groups without division intoprimaryandsecondary. In version 1, these types are used to separate labels with and without the background. In version 2, the text background is defined in the label group options. To set a custom background cover, use theimageoption in thelabelGroupDefaults.
// Example of plugin options in version 1
{
    dracoScriptsUrl: 'https://unpkg.com/@2gis/mapgl-gltf@^1/dist/libs/draco/',
    poiConfig: {
        primary: {
            fontSize: 14,
            fontColor: '#000000',
        },
        secondary: {
            fontSize: 14,
            fontColor: '#000000',
        },
    },
    ambientLight: {
        color: '#ffffff',
        intencity: 3,
    },
    hoverHighlight: {
        color: '#ff000088',
        intencity: 0.0,
    },
}

// Same plugin options in version 2
{
    labelGroupDefaults: {
        fontSize: 14,
        fontColor: '#000000',
    },
    hoverOptions: {
        color: '#ff000088',
    },
}
Changes in plugin events
-
Changes in the
ModelTargetinterface:- Made the
modelIdoption mandatory. Now it accepts only thestringtype. - Removed the
floorIdoption.
- Made the
-
Renamed the
PoiTargetinterface to LabelTarget:- Replaced the
typeoption value withlabel. - Changed the
dataoption to accept the LabelOptions value. - Renamed the
modelIdoption tobuildingId. Now it accepts only thestringtype. - Changed the
floorIdoption to accept only thestringtype.
- Replaced the
-
Replaced the
GltfPluginPoiEventinterface with
Changes in plugin methods
- Removed the
addModelsPartiallymethod. Partial adding of models is available in theaddModelsmethod:
// Example in version 1
plugin.addModelsPartially(
    [
        {
            modelId: '347da1',
            coordinates: [82.88651, 54.98092],
            modelUrl: 'http://example.com/models/model1.glb',
        },
        {
            modelId: 'f932d2',
            coordinates: [82.88659, 54.98101],
            modelUrl: 'http://example.com/models/model2.glb',
        },
    ],
    ['347da1'],
);

// Same example in version 2
plugin.addModels(
    [
        {
            modelId: '347da1',
            coordinates: [82.88651, 54.98092],
            modelUrl: 'http://example.com/models/model1.glb',
            interactive: true,
        },
        {
            modelId: 'f932d2',
            coordinates: [82.88659, 54.98101],
            modelUrl: 'http://example.com/models/model2.glb',
            interactive: true,
        },
    ],
    ['347da1'],
);
- Removed the second
preserveCacheargument from theremoveModelandremoveModelsmethods. To hide a model on the map, use thehideModelandhideModelsmethods:
// Example in version 1
plugin.removeModel('ea234f1', true);
// or
plugin.removeModels(['ea234f1', 'abc354', ..., 'def123'], true);

// Same example in version 2
plugin.hideModel('ea234f1');
// or
plugin.hideModels(['ea234f1', 'abc354', ..., 'def123']);
- Replaced the
addPoiGroupmethod withaddLabelGroup:
// Example in version 1
plugin.addPoiGroup({
    id: '722ea9',
    type: 'primary',
    elevation: 30,
    data: [
        {
            coordinates: [82.886554, 54.980988],
            label: '10 sqft',
        },
    ],
});

plugin.addPoiGroup({
    id: '456qwe',
    type: 'secondary',
    elevation: 33,
    data: [
        {
            coordinates: [82.886, 54.98],
            label: '20 sqft',
        },
    ],
});

// Same example in version 2
plugin.addPoiGroup({
    id: '722ea9',
    image: 'default',
    elevation: 30,
    labels: [
        {
            coordinates: [82.886554, 54.980988],
            text: '10 sqft',
        },
    ],
});

plugin.addPoiGroup({
    id: '456qwe',
    elevation: 33,
    labels: [
        {
            coordinates: [82.886, 54.98],
            text: '20 sqft',
        },
    ],
});
- Replaced the
removePoiGroupmethod withremoveLabelGroup. - Removed the
preserveCacheargument from theremoveRealtyScenemethod. To hide and then show the realty scene, use thehideRealtySceneandshowRealtyScenerespectively:
// Example in version 1
plugin.removeRealtyScene(true);
plugin.addRealtyScene([ ... ]);

// Same example in version 2
plugin.hideRealtyScene();
plugin.showRealtyScene();
Changes in other interfaces
- Changes in the ModelOptions interface:
- The
modelIdoption accepts only thestringtype now. - The
interactiveoption contains thefalsevalue by default.
- The
// Example in version 1
plugin.addModel({
    modelId: 1234,
    coordinates: [55.27087, 25.19668],
    modelUrl: 'http://example.com/models/model1.glb',
});

// Same example in version 2
plugin.addModel({
    modelId: '1234',
    coordinates: [55.27087, 25.19668],
    modelUrl: 'http://example.com/models/model1.glb',
    interactive: true,
});
- Changes in the BuildingFloorOptions interface:
- The
idoption accepts only thestringtype now. - Renamed the
poiGroupsoption tolabelGroups. Now it accepts the LabelGroupOptions array.
- The
- Renamed the
PoiGroupOptionsinterface to LabelGroupOptions:- The
idoption accepts only thestringtype now. - Removed the
typeoption. Use theimageoption instead and pass settings of the text background cover in a label group as an argument. - Renamed the
dataoption tolabels. Now it accepts the LabelOptions array.
- The
- Renamed the
PoiOptionsinterface to LabelOptions:- Renamed the
labeloption totext.
- Renamed the
// Example in version 1
plugin.addRealtyScene([{
    ...,
    floors: [{
        id: 235034,
        text: '1-10',
        modelUrl: 'http://example.com/models/model1_floor1.glb',
        poiGroups: [
            {
                id: 1111,
                type: 'primary',
                elevation: 5,
                data: [{
                    coordinates: [47.245048150280994, 56.134470449142164],
                    label: '3 Beds\n78.4 sqft',
                }],
            },
            {
                id: 2222,
                type: 'secondary',
                elevation: 5,
                data: [{
                    coordinates: [47.2451, 56.1344],
                    label: '2 Beds\n60 sqft',
                }],
            },
        ],
    }],
}]);

// Same example in version 2
plugin.addRealtyScene([{
    ...,
    floors: [{
        id: '235034',
        text: '1-10',
        modelUrl: 'http://example.com/models/model1_floor1.glb',
        labelGroups: [
            {
                id: '1111',
                image: 'default',
                elevation: 5,
                interactive: true,
                labels: [{
                    coordinates: [47.245048150280994, 56.134470449142164],
                    text: '3 Beds\n78.4 sqft',
                }],
            },
            {
                id: '2222',
                elevation: 5,
                interactive: true,
                labels: [{
                    coordinates: [47.2451, 56.1344],
                    text: '2 Beds\n60 sqft',
                }],
            },
        ],
    }],
}]);
- Changes in the BuildingState interface:
- Replaced the
modelIdoption withbuildingId. Now it accepts only thestringtype. - The
floorIdoption now accepts only thestringtype.
- Replaced the
// Example in version 1
plugin.addPoiGroup({ ... }, {
    modelId: 1111,
    floorId: 2222,
});
// or
plugin.addRealtyScene([ ... ], {
    modelId: 'abc123',
    floorId: 'def456',
});

// Same example in version 2
plugin.addLabelGroup({ ... }, {
    buildingId: '1111',
    floorId: '2222',
});
// or
plugin.addRealtyScene([ ... ], {
    buildingId: 'abc123',
    floorId: 'def456',
});